Showing posts with label i heart my mac. Show all posts

Monday, December 22, 2008

Mac Tip #9: Undo and Redo

Sometimes when I am blogging or typing a love letter of sorts I write things and I want to scribble it out and change it and have it still look really professional.  Cause that's what I am: a professional blogger and lover.


So clearly I can not take a sharpie and scribble out the mistakes on my screen, although I did that once when I was three to my mom's friend's new Apple II e.  Oops.

So when I make a mistake and I choose a poorly written word, or I need to just simply start with a clean state after the first paragraph I wrote, I simply push:

"Apple key + Z" and the mistake disappears.

But then, in a moment of sanity when I decide that my word choice, before I deleted it, was actually GENIUS and I am sad that erased the word, or entire page, I simply push:

"Apple key + Y" and what was taken away, is now back!

Editor's tips and tricks.  Easy as pie. Apple pie.

Tuesday, December 16, 2008

Mac Tip #8: Putting Pettiness Aside

I left you in the cold yesterday  Mac users.  I am sorry, I had a final and babysat and yada, yada, yada.  Yes, potentially I could post another tip today, but in light of the Christmas spirit, I chose a video instead.

Enjoy.

p.s. I have no idea what a video has to do with the Christmas spirit. Nothing, in fact.  

Monday, December 8, 2008

Mac Tip #7: Spotlight and Spotlight Shortcut

Spotlight, located at the top right of your screen, is an easy way to quickly search for documents or applications without having to open the Finder window.  This can be beneficial if you already have lots of windows open and you don't want to open another, or you are not sure where your document or application is stored on your computer.  You can simply type in the name of whatever you are searching for in your computer and you will see a list of documents and applications come up on your computer!  Select the one you want, and you are good to go. It's like the "find it" feature on a PC, only you don't have to watch that flashlight roll around...and around....and around.

The Spotlight Icon, is found here, and looks like a magnifying glass:


You have two options to utilize this feature.  Either move your mouse there, click, and begin typing, or use this short cut:

Command + space bar

The spotlight function will pop up right away and you can start typing.  Once you type in the document name, use the arrow keys to navigate through the documents and once the one you want is selected, hit the "return" key to open it!  If you use the shortcut and decide you don't want to be in Spotlight anymore, then hit "command + space bar" and it will disappear.

Easy as pie!

Monday, December 1, 2008

Mac Tip #6: Quick Look

Sometimes, I want to see a document without actually opening it.  I want to look at the contents without waiting for the program to load.  Yes, I am that impatient.

Thankfully, Mac has shortcut to solve this issue.  It's called "quick look".  Quick look will only work if you have the leopard operating system (this is the newest operating system available).  This tip will allow you to find your document quickly and easily.  

Open your Finder.  
Click on your Documents folder.
Highlight a document that is most likely titled the same as all of your other ones (BonnieLewis1.doc, BonnieLewis1a.doc, etc.) and this is why you are confused.
Click the space bar.
Voila!  A small preview of the document will pop up on your screen.  Take a look at it, and when you are done, click the space bar again and it will disappear.  

You can do this for photos, itunes artwork, and really anything that is in your Finder.  If it's an application, then it will show you a larger version of the icon with the application information.

 It's like peek a boo but for your computer.  Easy, easy easy. 

Monday, November 24, 2008

Mac Tip #5: Shortcut to Shutdown and Sleep


I know, shutting down your computer or putting it in sleep mode may not seem like a hard thing to do.  But check yourself.  I mean how often do you leave your computer running all day or all night simply because you forgot?  Didn't have time? Ran out the door too fast?

Already, if you have a mac, you are already being green with their environmentally friendly incentives , but making sure you remember to put your computer to sleep or shut it down is even better for the environment as well as your computer.

So, if you are leaving your computer for an extended amount of time, and are in a hurry, or just don't feel like using your mouse, simply follow these keyboard shortcuts:


To Sleep:

Option + Command+ Eject

{The Option button is right next to the Control button and says "Option". The Command Key is right next to that and has a picture of an apple on it, and the Eject button will be in your upper right corner}


To Shut Down:

Control+Option+Command+Eject   {Just add Control, which is labeled "ctrl"}


This makes me wish I had a shortcut in life to do the same thing.  


Sunday, November 16, 2008

Mac Tip #4: Zoom In

At some point, we all have trouble seeing and brining a magnifying glass every time you use your computer may be a bit odd. The print on some websites and the people in some pictures are just too small and you need a way to make it bigger.  Pulling the screen closer to you is not the best help, because after a while you will hit your nose to the screen.  So put away that magnifying glass, keep your head at a normal distance from the screen, and learn how to zoom in.
Find the "Control Key": 

(Yours will be far more streamlined than this, because this chunky one is from a PC.  It's located in the bottom left corner of your keyboard.)

Simply hold down this button while you move your fingers on your trackpad on your laptop (You know, it's where you control your mouse) in a upward motion.  You will see the screen get larger in front of you.   Once the words or picture is as big as you would like it, let go of the control key and use your fingers on the trackpad to move the screen around.  You will not be able to type or navigate when the screen is zoomed in,  you will only be able to look at what is on the screen.  To get the screen back to it's original size, hold down the control key again, and move your fingers in a downward motion.  If you have a desktop, do the same things as mentioned above, only use the scrolling feature on your mouse.  
Go on, give it a try:
isn't it so much better when you can see?

Monday, October 27, 2008

Mac Tip #3: Hot Corners

This is perhaps one of my favorite features on my Mac.  It's very simple, and once you use it, you will never go back.

"Hot Corners" is a feature that allows you to assign each "corner" or your screen to perform a different function when your mouse pointer goes to that corner.  So for example, you can have the top right corner show all the windows that are open, the top left corner bring up your dashboard and so on.  It's a great shortcut that will save you time, and stay organized.

So let's get started!

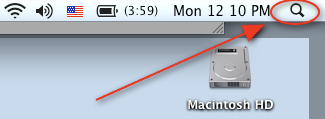
1.  First, click on the "System Preferences" icon on your dock.    If you have removed it from your dock, then simply click on your hard drive icon, and it will be in the "Applications" folder.  

2. Next, click on the icon that says "Expose and Spaces".  Make sure, that once this open, you are on the tab that says "Expose"(it will be highlighted blue as shown).  Spaces is another great organizational function we will get to next week.

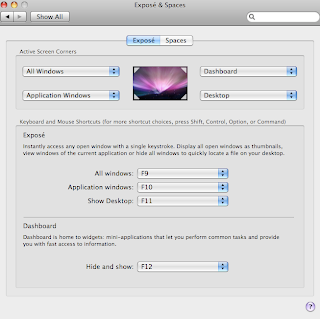
3. The screen should look something like this:


The four pull down screens  represent the four corners of your desktop.  Each pull down menu has a different option to assign to each corner.    Let me briefly explain each option:

All Windows- If this is selected, when the mouse is placed in the assigned corner, then all the windows that you have open in any application will be shown on your desktop.  This allows you to pick and choose which window you want at the front of your screen simply by clicking on it.

Application Windows- If this is selected, when the mouse is placed in the assigned corner, then all the windows that you have open only in the application which you are working in will show up, allowing you to see what you have open and click on the window that you would like to work on.  For example, if you have six windows open in Safari, and you use this feature you can see what you have open and which one you want to access.

Desktop-  If this is selected, when the mouse is placed in the assigned corner, then all the windows on the desktop will disperse, allowing you to see a clear view of your desktop.  You can even click on an icon on the desktop and it will bring all the previous windows back to the front of the screen, but the most recently clicked item on top.

Dashboard- If this is selected, when the mouse is placed in the assigned corner, then the dashboard will appear on your screen.  The dashboard icon may or may not still be in your dock, and is a place with little applications such as the weather, white pages,  or stocks.  We will learn about the dashboard function more later.

Spaces- If this is selected, when the mouse is placed in the assigned corner, then the "Spaces" function will begin.  Spaces is a great organizational tool that allows you to essentially have up to 16 different desktops.  It's perfect if you are doing numerous tasks at once.

Start Screen Saver- If this is selected, when the mouse is placed in the assigned corner, then the screen saver will start immediately.  Good way to leave your desk with the screen saver running if you are in the office and do not want anyone to see what you are doing, you know, highly sensitive material.

Disable Screen Saver- If this is selected, when the mouse is placed in the assigned corner, then it will disable the screen saver from starting.  This is a great feature if you are in a meeting or watching a movie but your preferences have your screen saver set to go on after a certain length of time, then this will stop that from happening.

Sleep Display- If this is selected, when the mouse is placed in the assigned corner, then your display, or screen, will go to sleep.  It's a great way to save energy!

Finally, the (-) means that you do not want anything to happen when the mouse is placed in the assigned corner.

Once you get the hang of it, and remember what function you assigned to what corner, you will use them all the time. Remember, to assign a corner, just simply select the desired function in the pull down menu.  It will be effective immediately, no need to click "save" or "apply".


Feelin' hot, hot, hot!

Monday, October 20, 2008

Mac Tip #2: Add and Subtract Items from Your Dock

By now you are an ol' pro at changing the size, location and bells of your dock.  Like a color coded closet, or a bookshelf in your home by the Dewey Decimal System, your dock has the capability of satisfying all of your type A, OCD, or just plain organized needs.

Most likely, you have a few icons on your dock that look totally cool and really awesome if you knew how to use them, and you may even know how, which is a bigger plus for you.  If not, then you can always sign up for a One to One appointment at the Apple store, in which you will be taught by an Apple teacher, one on one, once a week for a whole year.

Until then, let's clean up that dock so that you can click and when it pops up, you won't find yourself just staring at the dock.  The dock's purpose is to keep your most used programs in a very accessible way, so if you don't use an icon, let's get rid of it.  Or a program that you use lots, but hate having to open it through the hard drive, then let's put it in the dock so you can point and click.

But how?  Easy! I promise:

To get rid of any icon in your dock:

Simply click on an icon and hold down the mouse (or trackpad) button.
Drag it out of the dock and on to the desktop area.
Let go of your mouse (or trackpad) button and watch it disappear!
This action does not delete the application from your computer, it can always still be found in the Finder and on your Hard Drive.


To add any item to your dock:


Open the finder which is the face button on the left hand side of your dock.
     This is where you will always find any document, application, program etc.  Also, this can not be removed from the dock, so if you keep trying and can't...it's not your fault!
Click on the file that says "applications" and look for the appropriate application that you want to find.
Once you find the application that you want to add to your dock, click on the appropriate icon and hold down the mouse button (or trackpad) and drag it into the dock.  Let go of the mouse and watch it appear!
     You can put any icon anywhere.  So I like to put like icons next to each other.  But you can do what you want, and you don't have to admit that you color code or alphabetize your icons.


A few extra tips:
If you have the Leopard operating system, each time that a program is open, there will be tiny spot light underneath the icon.  The Finder will always have that spotlight, so again, you can stop trying to get rid of it.

Don't know what your icons do?  Just try them out, and have some fun!

Monday, October 13, 2008

Mac Tip #1: Dock

Alright, here we go, round one.

I think I have perpetual OCD when it comes to my dock. Do I want it real big or real small? On the bottom of my screen or the side of my screen? Do I want every application that I have ever used on there, or just two of my favorites? I do know that I love to have it magnify when I roll my mouse over it.

What the heck am I talking about?

The dock is simply a view of applications in pictures that are easily accessible on your Mac:


When your software is initially installed, it will look pretty generic, will be located at the bottom of your screen and you may have a heart attack if you are OCD and will feel the need to change it immediately. So here is how:

1. On your dock, click the System Preferences icon:


2. You will then be taken to the System Preferences screen. Click the icon that says Dock:


3. Here you can adjust the size of the icons, the magnification, placement on your screen, minimization, animation, and visibility preferences:


If you are new to a Mac, you may be confused as to why you do not get 50 billion pop-up windows asking you to click "Apply". On a Mac, when you click something, it will change automatically. It saves you time and frustration, because as you make a change, you can test it out right away, without having to jump through any hoops. Unless of course, you are hula-hooping out of pure joy that it was so easy. Then, yes, that is from a Mac.


Too many icons on your dock? Too little? Next week, on "i heart my mac Mondays", we will learn how to organize, and add and subtract applications from your dock, as well as another was to access applications easily that you do not want in your dock. Stay tuned.

This was, of course:

Monday, October 6, 2008

i heart my mac mondays

Alright, the time has come to share that I have fully, officially with no reservations, become a total Mac snob. Fanatic. Lover. Guru. Partially, it's because my husband works for Apple and I have washed so many Apple logos printed on T-shirts, been to the store more times than even the avid Mac user could count, and personally thank Apple for assisting in helping our family eat. But, the other part, is that I own a Mac, and I love it.

The streamline simplicity of my black Mac book shouts sophistication, while the glowing Apple logo on the back of the computer screams creativity. You don't believe me? According to this study, when a group of participants were given subliminal messages in the form of pictures of either an Apple or IBM logo, participants responded more creatively after seeing the Apple logo vs. the IBM logo. If this information is not enough for you to glare at your PC, point your finger, shout, and blame it for all your attempts at failed creativity, then perhaps the next Windows pop-up message will do the trick. Come on, don't hide, we all want to forget those burned cupcakes, the drawings that no one can recognize, the projects that got thrown into the recycle bin on accident, and that dress you really tried to sew (but somehow ended up with only one sleeve)? That is exactly, my friends, why having a Mac comes in handy.

So, from this moment on, Mondays will be dedicated to the celebration of Apple. Mac tips and tricks, application shortcuts, new products, new designs...you name, and I will try to have it. And if you don't have a Mac to join in that celebration, please do not put away those dancing shoes just yet. Tune in, but I will not foot the bill when you break down after a few, harmless Mac Mondays and find yourself charging a different type of apple than granny-smith to your credit card.


feeling creative yet?